Baby Ecology book is here! Learn more
Baby Ecology book is here!
- Home
- Baby activities
- DIY Play Area for Babies
DIY play area for babies that fosters exploration and learning
by Anya Dunham, PhD
How (and why) we created a fully enclosed DIY play area for our babies. A safe play area will benefit your baby – and your family – for years.

(Scroll down to see how we created ours and to share your photos if you like!)
Creating a DIY play area for your baby can be a fun project. Have you considered gating the play area to make it extra safe for your baby to explore?
You might be thinking, well, we are going to babyproof our home anyway. But it isn’t quite the same thing.
What is a safe play area (or a “YES space”)
You may have heard the term “yes space” in RIE or Montessori circles. Put simply, it's a completely safe environment for your baby to play, move, and explore.
This could be a play yard, a gated-off area or a whole room if your home allows. Most importantly, this play area must be absolutely, completely safe for your baby. Magda Gerber, the founder of the Resources for Infant Educarers (RIE), invited parents to think of a “safe place” as so safe that if you accidentally got locked out of the house, your baby might end up hungry and wet, but would be completely unharmed.1 Of course, getting yourself locked out of your home is never recommended, but I'm sure you get the idea!
Benefits of a safe play area for babies
Gates may seem confining to adults, but to babies they can provide a sense of safety and freedom. As your baby figures out routines and patterns and becomes used to his play area, he will know that he’s free to explore. He won’t bump his head on a sharp corner or keep hearing “no” as he might while navigating spaces set up for adults or older children. In her book Elevating Childcare2 and in her podcast Unruffled, Janet Lansbury coined the term “yes space” for just that reason.
The biggest benefit of such a play area is that it allows your baby to experiment safely and to focus on his interests uninterrupted. For example, a 9-month-old pulling everything off a shelf might be exploring how different objects fall. This could be a problem in the living room, but a perfect activity in a safe play area where the shelf is low and secure and play objects are soft, light, and unbreakable.
A safe play area offers your baby what early childhood educators call “scaffolding”: just the right help, at just the right time, in just the right way to support development and learning. You can give your baby just the right support — an interesting environment, complete safety, and uninterrupted time — so she can focus on what interests her most. She is free to explore, learn, and master new tasks at her own pace.

Last but not least, a safe play area will be helpful for you, particularly if you have older children or pets or work from home. It allows you to go to the bathroom or answer the phone without worry — and without having to bring your baby with you every time, holding her or placing her in a baby seat or swing. (Relying on baby “containers” is not the best.)
How to DIY a safe play area for your baby
A play area can be set up very simply: a gated off flat surface to move on freely and a few safe play objects. Babies who aren’t yet mobile or are learning to roll will be most comfortable on a mat or a carpet; babies who crawl can benefit from having a carpeted area and a slippery floor to scoot or slide on, if your space allows for both.
It is ideal to create a "yes space" when your baby is very young and before she is mobile - that way she will learn to see it as a nice place to be in from the very beginning. That being said, you can, of course, create a "yes space" any time.

It is best to introduce your baby to the safe play area when she’s well-rested and not hungry. Regardless of how old your baby is, you can begin by telling her about the new space you created and showing her around; then, place her down on a flat surface, in a position that allows her to move freely. If your baby is old enough to be interested in play objects, put a few within her reach. Sit quietly beside her and watch what she chooses to do. After a while, you can begin leaving the play area briefly. Always remain nearby so you can respond whenever your baby needs you. Our goal is creating opportunities for free, child-led play – not necessarily independent (alone) play.

You might wonder whether having one consistent play area would eventually become boring for your baby. But her cognitive and motor development progresses incredibly quickly. She won’t easily get bored of the same space because she will continue to discover new ways to use it. For example, in the early months she might be interested in gazing at the light coming from the window; later on she’ll begin pulling up and perhaps cruising while holding on to the window sill; later yet, she might begin to purposefully arrange her toys along the edge.
Introduce new play objects as you notice your baby’s skills and interests grow. If you have a large collection of toys, consider dividing them into a few smaller sets and rotating them: putting out one set at a time while storing the rest. There is a good chance your baby will spend more time focusing on each toy when there are fewer toys present (toddlers do3); plus, it’ll be easier for you to clean and tidy up.
When you add play objects, and every time your baby masters a new skill, re-assess her play area: is it still completely safe?

Find out more about which toys and activities help - and which hinder - babies' learning in my book, Baby Ecology.
DIY play area for babies: how we did it
With our first baby, we gated off what was supposed to be our living room. We had just moved to a new home when she was born and didn’t have much furniture; the room simply had a couch, a coffee table with rounded corners, floor pillows, and toys. And it indeed was the perfect “living room” for us at the time, as we spent a lot of time sitting on the floor and reading to our daughter, playing with her, or simply watching her play.
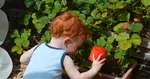
When our second baby was born, we used linkable and extendable baby gates to create a 100% safe DIY play area out of a corner of the living room. We started spending time in this area when she was about 6 weeks old. I covered the carpet with a flannel sheet and tucked it under the gate to create a washable surface.
(The orchid was nice for our baby to look at early on, but we removed it well before she mastered standing up.)We started out with very simple toys: stackable cups, cloth books, and a taggie blanket her sister made for her. Over time we added a foldable gymnastics mat and more toys and non-toy play objects, like dryer balls and silicone kitchen utensils (the spatula was a favorite!):

We rotated the toys and play objects every couple of weeks, so at any given time a manageable collection was available - and to make it more fun by something ‘new’ appearing once in a while. Our daughter often found new uses for objects she played with before, so she didn’t get bored easily.

The rest of the living room was still babyproofed and had toys our preschooler and our baby could enjoy together, with me always at arm’s reach.

As our baby grew, we added a play kitchen with toy food, dolls and a doll stroller, toy cars, and a cloth bookshelf with board books (again, rotating lager play objects so she had space to move around and explore). She had her play area until she was about 3 years old.
By the time our third baby was born, his sisters were used to doing crafts, watching TV, and reading in the living room. So this time we created three separate areas by using the same extendable gates: a 100% safe area for baby, a lounge area for big kids only, and a shared area for everyone:
 (The stair balusters are covered with a clear sheet of smooth plastic, so they cannot be grabbed onto. We moved the play area away from the stair rails well before our son mastered climbing.)
We are fortunate to have a large, open living area that we can configure as our family’s needs change. If you don’t have a lot of space, you could:
- Purchase a smaller-footprint play yard (keeping in mind, however, that an older baby does need a fair bit of space to move and explore)
- Creatively use existing furniture: for example, move the couch away from the wall and turn the back of the couch into a “wall” for your baby’s play space
- Sell or store away some adult furniture to make space. It's only for a few years - the years when you're unlikely to make much use of a fancy coffee table anyway!
Although creating a 100% safe play area takes time and resources in the beginning, it has the potential to benefit your baby – and your family – for years.
What does your baby's play space look like?
I would love to hear about, and see photos of, your baby’s play space! How did you create it? What are your baby's favourite toys or play objects?

You might also like:
"Container Baby Syndrome": What it is and how to avoid it
Container baby syndrome refers to movement, behavior, and other problems seen in babies who spend too much time in various seats that inhibit movement.
Independent play for babies: Is 'independent' the goal?
Everyone talks about independent play for babies and young children. But wait, is our goal independent play or free play?
Can babies get bored?
Can babies get bored? Let's look at the research to see what, if anything, babies need to avoid boredom.

References
References
1. Gerber M (1998) Dear parent: caring for infants with respect. Resources for Infant Educarers, Los Angeles, CA, USA
2. Lansbury J (2014) Elevating child care: a guide to respectful parenting. JLML Press, Malibu, CA, USA
3. Dauch C et al (2018) The influence of the number of toys in the environment on toddlers’ play. Infant Behavior and Development 50: 78-87
Using hundreds of scientific studies, Baby Ecology connects the dots to help you create the best environment for sleep, feeding, care, and play for your baby.

Warmly,
Anya

Hello! I'm Anya Dunham, a scientist with a PhD in Biology, an award-winning author, and a mom to three young kids. Here and in my book, Baby Ecology, I analyze the research on baby's first year to find the optimal nurturing environment — the (usually wide) range of good options — to help you choose what works best for your baby and your family. Welcome!

Let's stay in touch